
How To Draw A Simple Mushroom
Let’s draw a mushroom together in a few simple steps!
Drawing mushrooms is very fun and a cool way to hone your art skills. We’ll break it down into easy shapes to make it simple for you.
Did you know that mushrooms are a type of fungus that you can find all over the world?
Today, the mushroom we’re drawing is called a fly agaric, or Amanita Muscaria in fancy science language.

It’s super colorful, bright red with white dots, so you often see it in cartoons and movies.
But be careful; this mushroom is not for eating because it’s poisonous, even though it looks pretty.
I’ve had a blast learning to sketch these cute fungi. It’s a fun way to get to know a mushroom’s different parts and can help you recognize different kinds out in the wild.
If you enjoy this tutorial, you might also like our other lessons on drawing a half moon, a spacecraft, and an adorable gnome!

And be sure to take advantage of the mushroom-themed coloring pages for kids and adults on our sister site. They’re free!
What You Need to Start
- Pencil
- Paper
- Eraser
- Pencil sharpener
- Colored pencils or markers
Step-By-Step Guide For How To Draw A Simple Mushroom
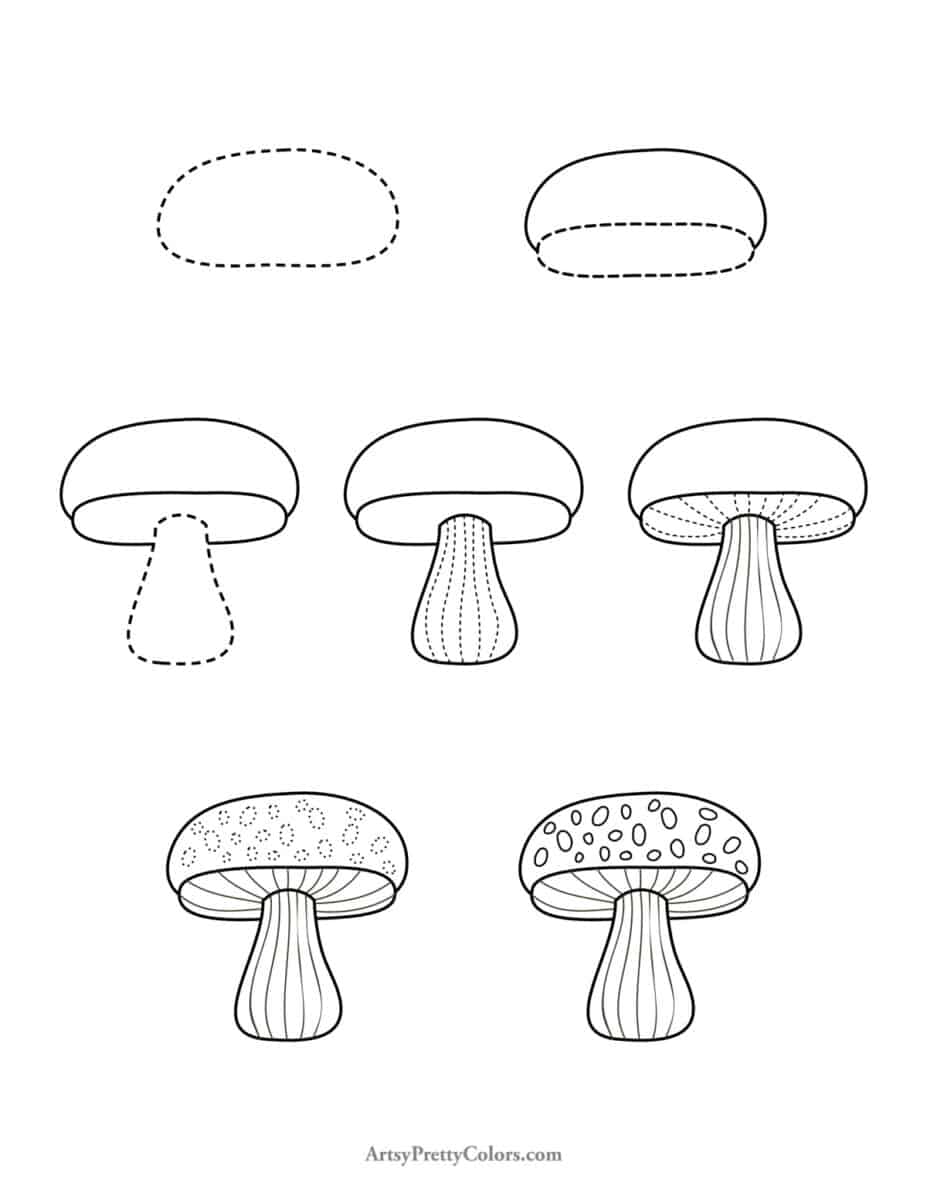
Step 1. Draw The Mushroom’s Cap

Start with the cap. Imagine it’s like an egg but flatter and with smoother edges.
Step 2. Create The Underside Of The Cap

Now, draw a smaller oval right underneath the cap. This should be slightly narrower than the cap itself.
Step 3. Sketch The Stem

The stem looks a bit like a pear, wider at the bottom and narrowing as it goes up. Place it right under the cap.
Step 4. Add The Stem’s Details

Our mushroom has lines running down the stem.
Draw these gently from top to bottom, curving them just like the stem. Aim for about five lines.
Step 5. Add The Gills Under The Cap

Next, let’s draw the gills. Start from the stem and draw curved lines reaching out to the edge under the cap.
The lines close to the front should meet the vertical lines on the stem, and the others should go behind the stem.
Step 6. Add White Spots To The Cap

Now for the fun part – the spots! Draw small ovals on the cap to create those famous white spots.
Step 7. Color The Mushroom

Finally, color in your mushroom. Use bright colors to bring it to life. Feel free to add extras like grass, little toads, or even fairy houses around it.
You can also draw different species types to create a whole family of them.
Don’t forget to Pin it for later!
How To Draw A Simple Mushroom
A really fun tutorial for how to draw a simple mushroom. This drawing lesson breaks down a mushroom's parts into basic shapes to make it easy for you to learn how to draw.
Materials
- pencil
- paper
- eraser
- pencil sharpener
Tools
- Please see the full materials list above the tutorial for details and links.
Instructions
- Draw The Cap
- Create The Underside Of The Cap By Adding Gills
- Draw The Stem Which Is Pear-Shaped
- Add The Stem's Details As Vertical Lines
- Add The Mushroom’s Gills To The Lower Part Of The Cap
- Add White Spots To The Cap, These Are Oval
- Color The Mushroom- Optional