
How To Draw A Santa Hat -Fun Tutorial!
In this tutorial, you’ll learn how to draw a Santa hat in 8 easy steps.
Drawing a Santa hat is really fun, especially around Christmas time! It’s perfect for making your holiday cards extra special.
Imagine surprising your family and friends with a card with a cool Santa hat you drew all by yourself!
Don’t worry; drawing a Santa hat is simple once you know what shapes to use.
We’re going to show you step-by-step how to do it.
Plus, if you love drawing, we’ve got many more tutorials, like sketching a whimsical gnome or a short-sleeve shirt.
And for more Christmas cheer, check out our Santa color-by-number pages and free elf coloring printables.
Need some more card-making inspiration? We’ve got a list of 37 homemade card tutorials for you to explore on our DIY site.
Drawing Materials You’ll Need
- Sheet of paper
- Pencil
- Eraser
- Pencil sharpener
Optional Materials
- Crayons
- Markers
- Colored pencils
Step By Step Instructions For How To Draw A Santa Hat
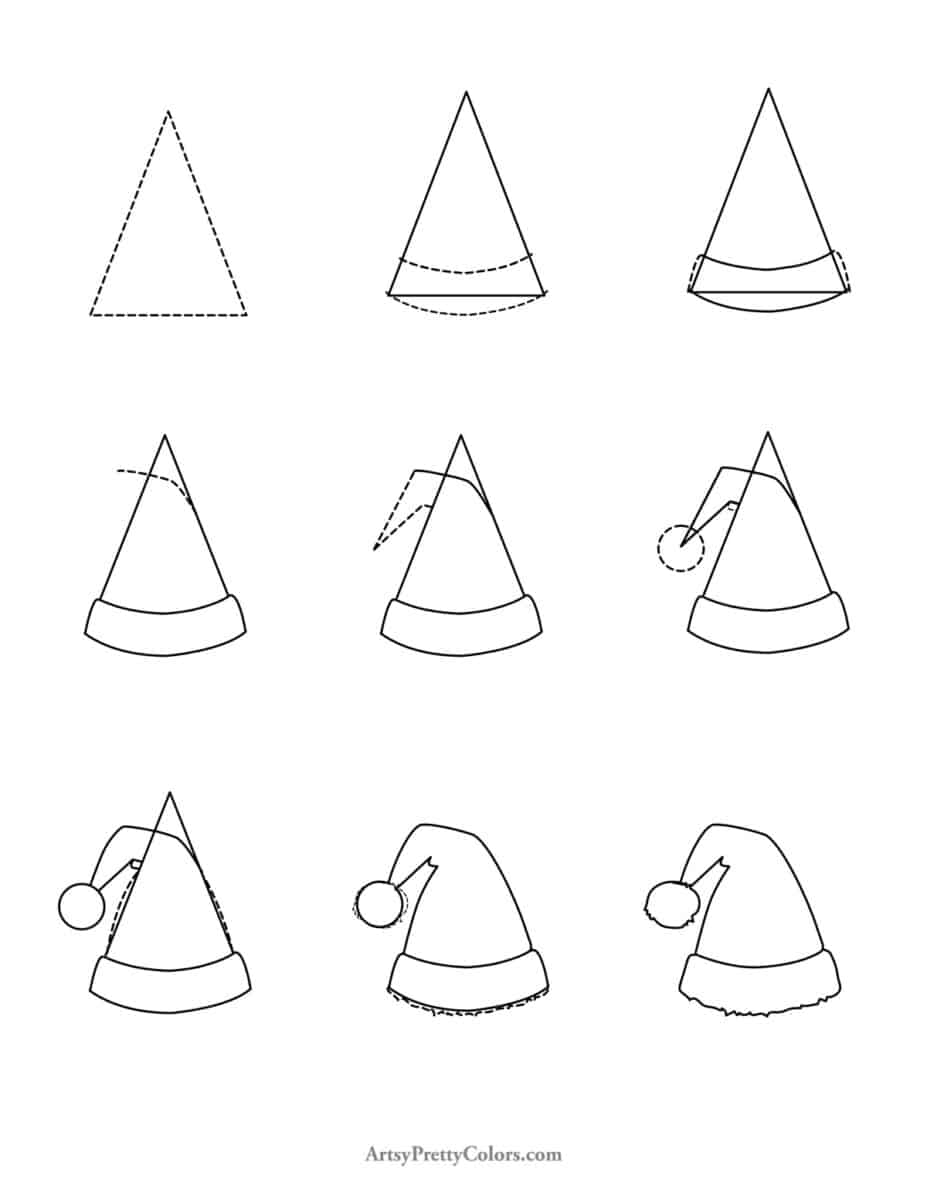
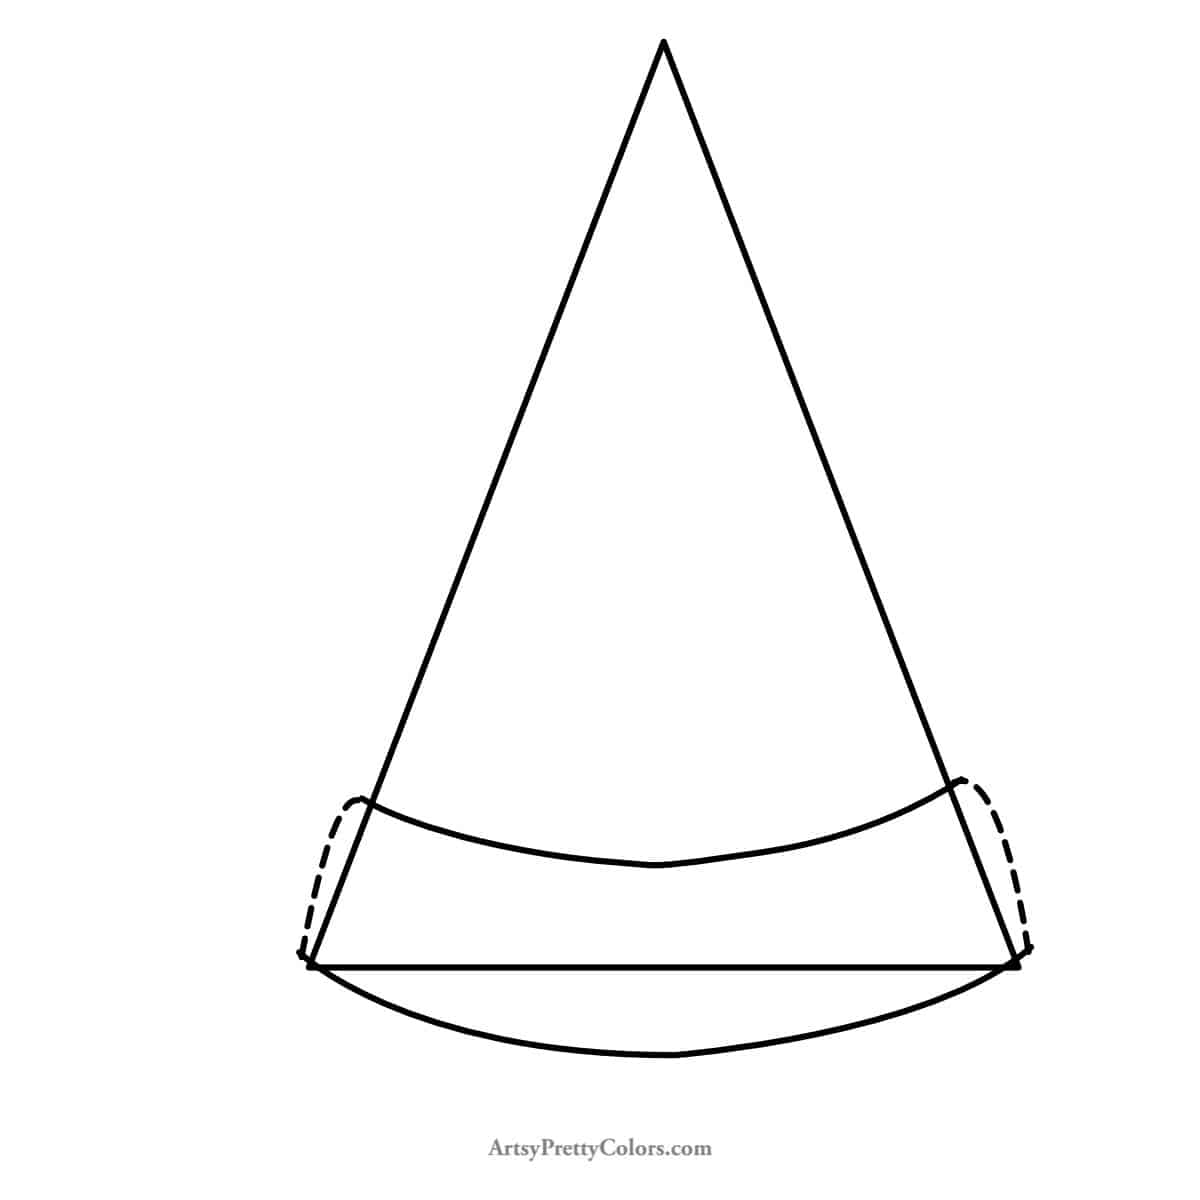
Step 1. Create The Overall Hat Shape

Start by drawing a triangle that’s taller than it is wide. This will be the main part of your Santa hat.
Step 2. Form The Bottom Shape

Next, draw a big, curved line at the bottom of your triangle.
This line should stick out a little bit past the triangle’s base.
Step 3. Add Sides To The Bottom Fold
Now, draw two lines to close off the hat’s fur section at the bottom.
These lines should curve inward slightly, making the top part wider than the bottom.
Step 4. Create The Bend Near The Tip
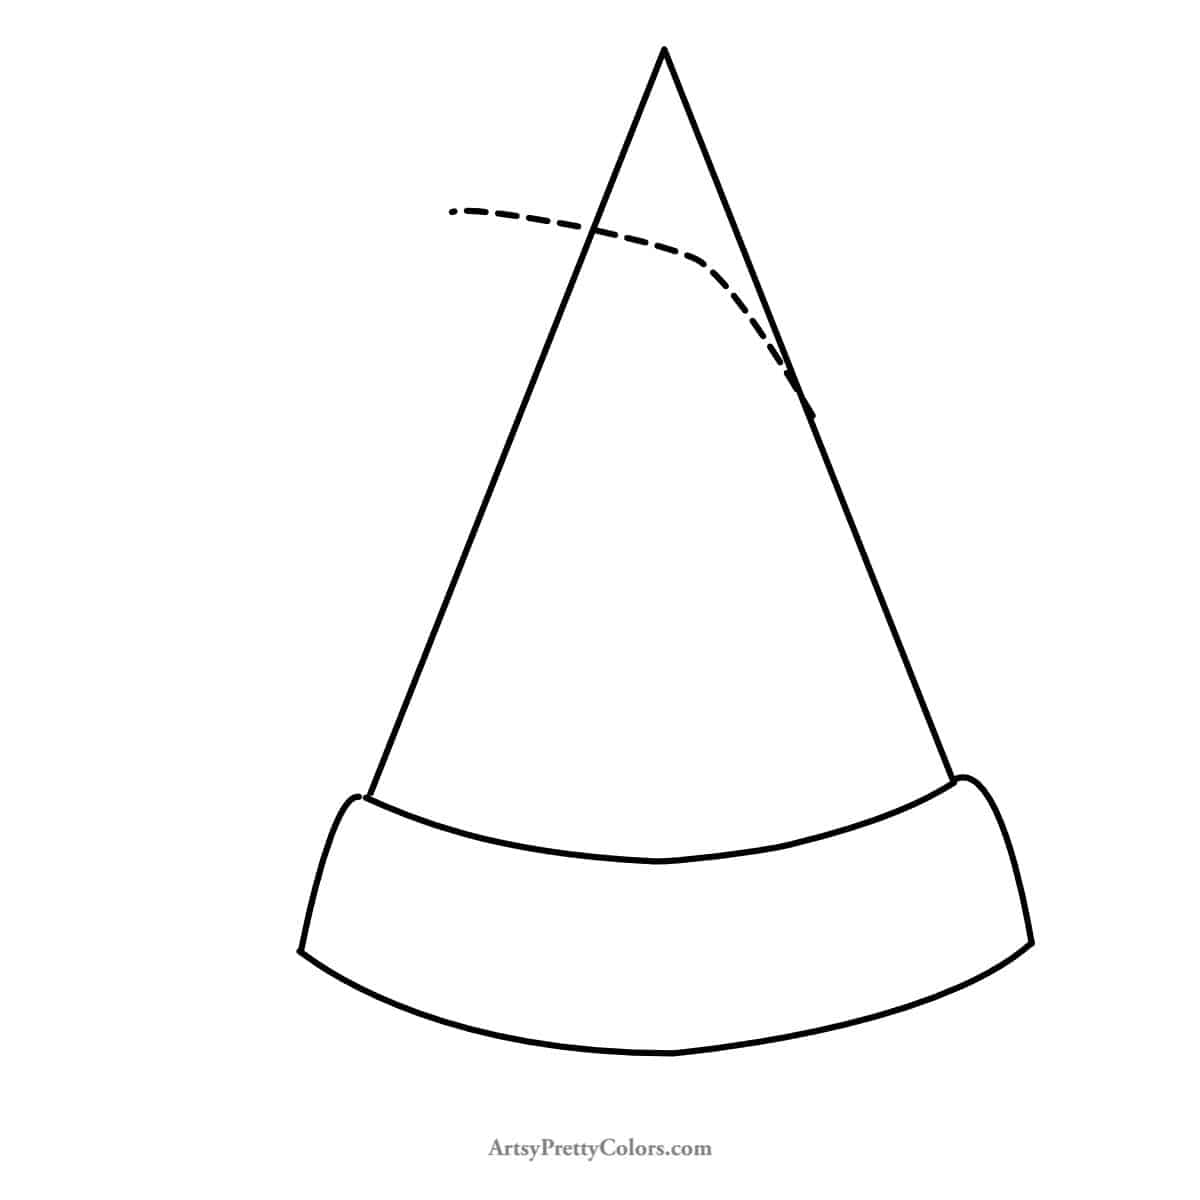
About one-third of the way down from the top of the hat, draw a line that bends from the right side toward the left.
Extend this line past the hat’s left side, about as far as the hat is wide at that point.
Step 5. Add The Tip

From the end of the line you just drew, add two diagonal lines pointing slightly outwards.
Then, connect these lines back to the hat to form the tip.
Step 6. Draw The Pom Pom

It’s time for Santa’s iconic pom pom! Draw a circle above the tip of the hat, centered with the tip.
Add a little L-shaped line beneath it for extra detail.
Step 7. Shape The Christmas Hat

Erase the very bottom tip of the hat under the pom pom.
Then, draw two curves on the sides of the hat to give it a more natural, floppy look.
Step 8. Add Faux Fur

Finally, erase any unnecessary lines inside the main hat shape, leaving the circle for the pom pom and the bottom fold line.
Add small, wavy lines along the bottom of the hat and around the pom pom to create the fluffy, white fur look.

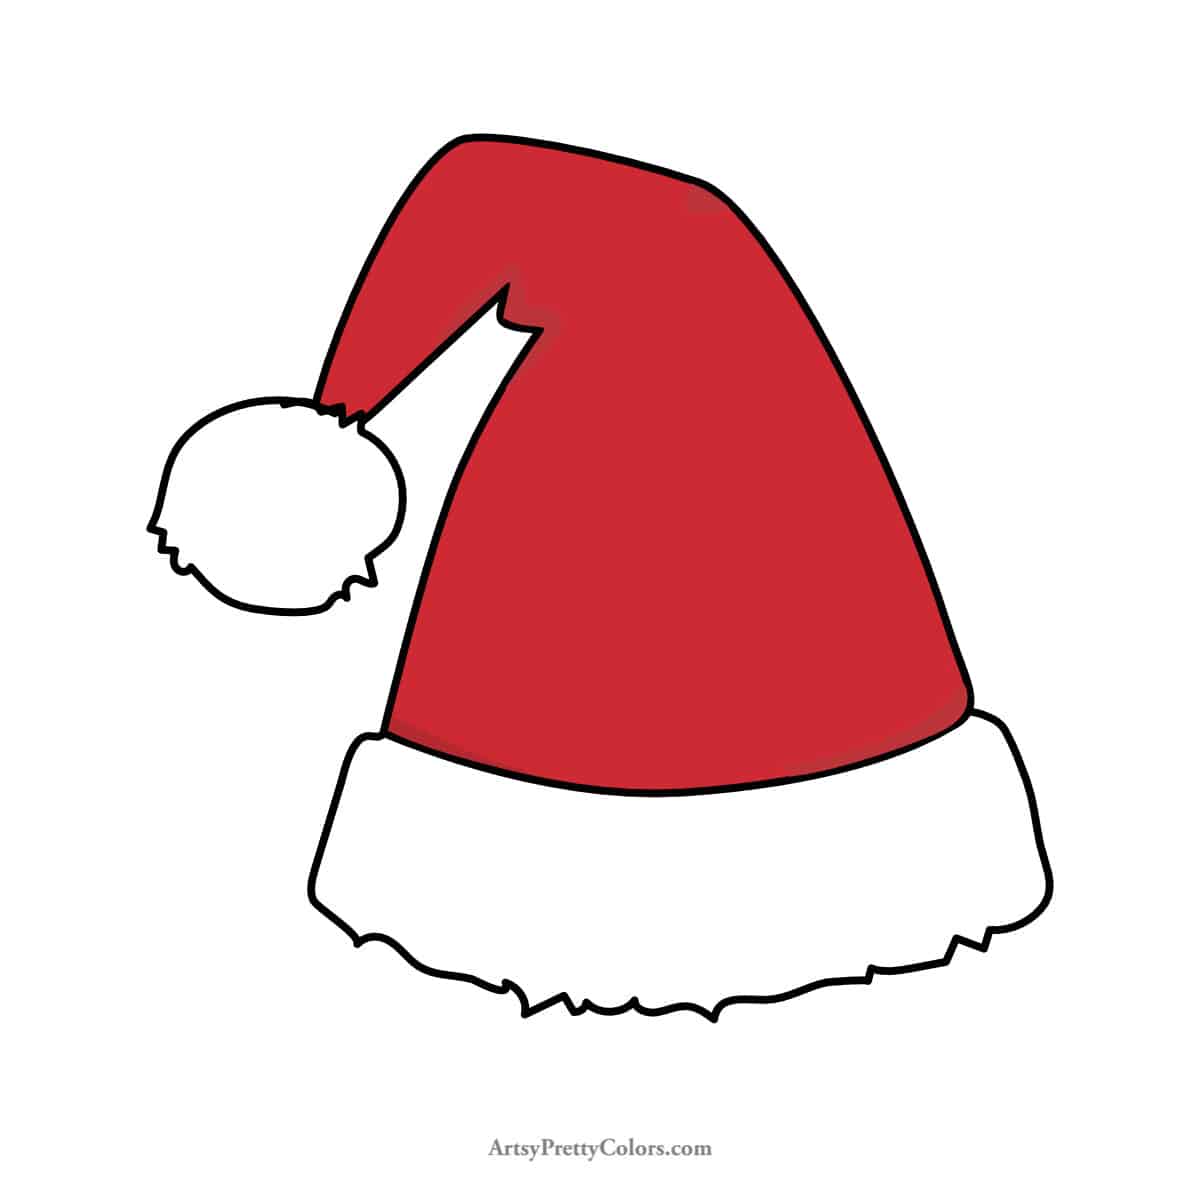
And there you have it, your very own Santa hat drawing! Feel free to color it in and use it to make your holiday cards stand out.
Happy drawing and happy holidays!
Don’t forget to Pin it for later!

How To Draw A Santa Hat -Fun Tutorial!
A fun tutorial for how to draw a Santa hat. This simple tutorial will show you how to easily make this jolly fellow's hat. Perfect for putting on Christmas cards.
Materials
- pencil
- eraser
- paper
- pencil sharpener
Tools
- Please see the full materials list above the tutorial for details and links.
Instructions
- Create The Overall Shape Of Santa’s Hat Which Is A Triangle
- Form The Shape For The Bottom
- Add Sides To The Bottom Fold As Two Curves
- Create The Bend By drawing Lines That Extend to The Left
- Add The Tip Of The Hat By Drawing Two Diagonal Lines
- Draw The Pom Pom On The Tip As A Circle
- Add Shape To Santa's Hat With Curves Outside The Hat's Sides
- Add Faux Fur With Curvy Lines Around The Bottom Fold And Ball